Editing By Ear
 There’s an easy way to edit your manuscript. You can listen to your story. Why is this a good idea? It’s helpful because your ears can catch a lot more of your mistakes.
For many people, the editing process can be tedious. You read over your story and somehow keep missing typos, repeated words, and so on. When you listen to something read aloud, you process it differently than when you simply see the text. Therefore, listening to your story can be a wonderful tool in your editing toolbox. Happily, there are a number of ways to listen to your story.
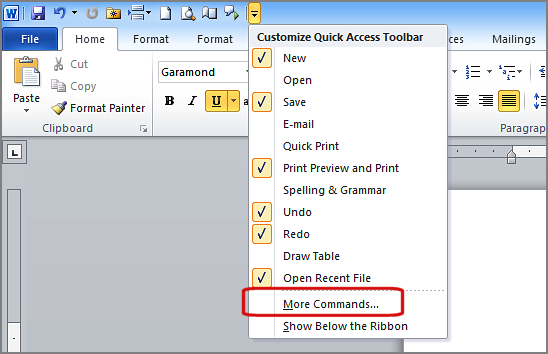
If you’re using Microsoft word, you can use SPEAK, the text-to-speech feature in MS Word to listen to your text. To add the Speak command to your Quick Access Toolbar, an article by Microsoft says to do the following:
1. Next to the Quick Access Toolbar, click Customize Quick Access Toolbar.

2. Click More Commands.
3. In the Choose commands from list, select All Commands.
4. Scroll down to the Speak command, select it, and then click Add.
5. Click OK.
After you have added the Speak command to your Quick Access Toolbar, you can hear single words or blocks of text read aloud by selecting the text you want to hear and then clicking the Speak icon on the Quick Access Toolbar.
![]()
This information was found in an article by Microsoft.
Happily, you can also use a Kindle Fire to listen to your story. Most have text-to-speech capabilities. Kindle Fires can be very reason-ably priced. They usually start at around $50.
I’ve listed the steps you need to take to get your story (document) from your computer to your Kindle Fire. At first, it might seem a little difficult, but once you take some initial steps, it’s really a very friendly process.
Every Kindle has its own email address and you can send files to your device as email attachments. There’s a step by step article that explains everything. Check it out here.
Note: Please pay special attention in the instruction that tells you that “Documents can only be sent to your Kindle devices or apps from e-mail accounts that you added to your ‘Approved Personal Document E-mail List.’”
The document should show up in the Kindle “Docs” folder within a short amount of time. Tap on “Docs” folder to see if it’s been downloaded. Sometimes it takes a bit longer.
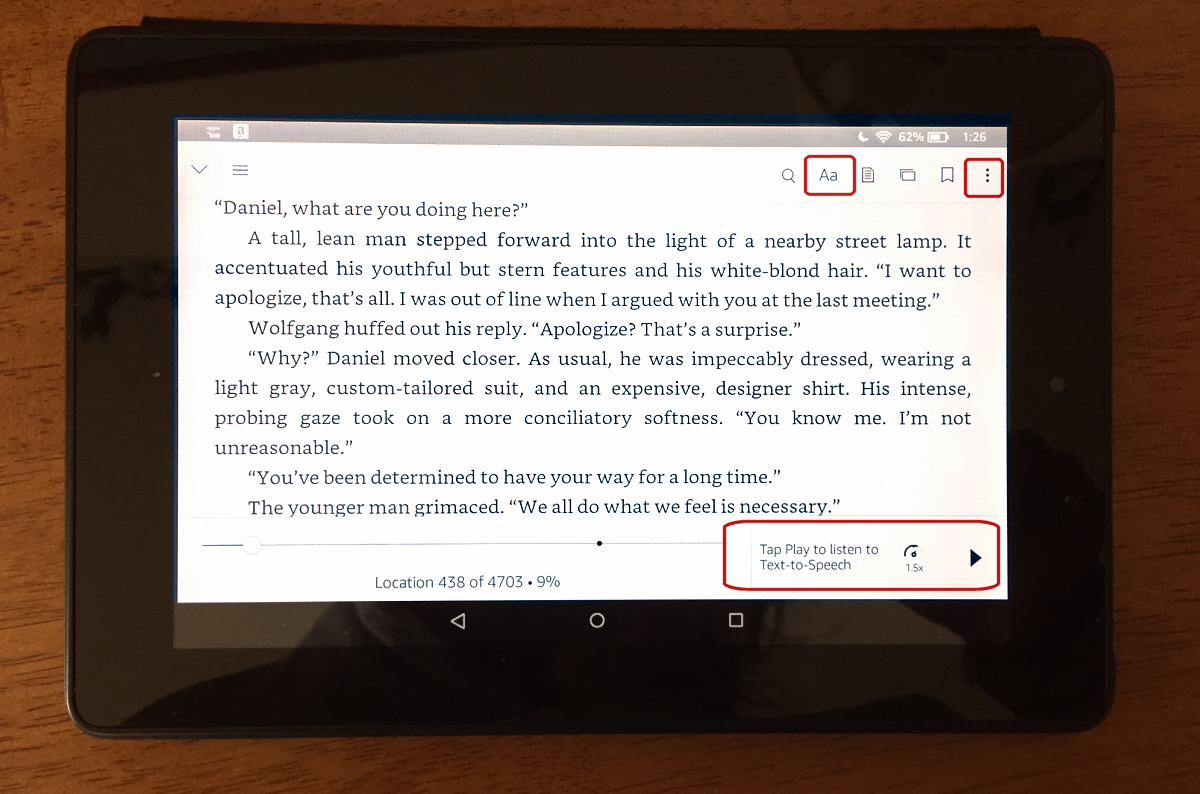
Open your document on your Kindle just like you’d open a book. Next, you’ll have to make sure your text-to-speech function is enabled. Here’s what to do to enable it.
1. While in reading mode, tap the center of the screen, and then tap “Aa” (Settings).
2. Tap “More Options” and then tap “On” next to “Text-to-Speech.”
*IMPORTANT NOTE: Some Kindle models are a little different, and you have to check out the three little dots and select from that menu.

Once you are in reading mode again, tap the screen to show the reading toolbar again, and then tap the “Play” button next to the reading progress bar to hear the text read aloud.
Check out an article here for complete directions.
If you have an iPhone or iPad with the Kindle app on it, you can listen to your documents on your iPhone or iPad. However, you’ll have to enable the text-to-speech capability on your iPhone or iPad. See instructions below.
1. Launch “Settings” and tap on “General”
2. Scroll down to “Accessibility” and tap on “Speech” and then on “Speak Screen”
3. Slide to “ON”
Next, open your Kindle app on your iPhone and search for “Docs” in items listed. All your books and the documents you sent to your Kindle should be there. After you open your document on your iPhone, what’s next? To hear the contents on the screen, swipe down with two fingers from the top of the screen.
After learning about text-to-speech on your Kindle, you can listen to other people’s books too. You can be doing the dishes and catching up on a favorite read you haven’t had time for.